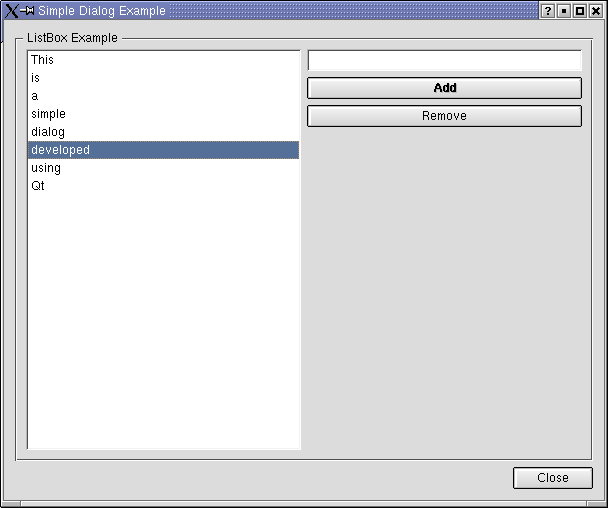
In this chapter we will start using Qt, to produce a more substantial application. We will build a simple dialog with a list to which the user can add items. Items in the list can also be removed.
Figure 5-1 shows what the application will look like when done. To create the design and author the code we will use the Qt Designer.
Figure 5-1 Our simple dialog.
The first stage will be to start a console and create a folder. I choose to name it ex05, but any name can be used. Use cd to make your way into the new folder and start Qt Designer by typing designer & (or designer-qt3 & in some distributions). It is possible to run Qt Designer from the menus provided in modern distributions, but we are going to run some commands from the console, so I recommend you to access it this way. This will (hopefully) leave you with the window shown in figure 5-2.
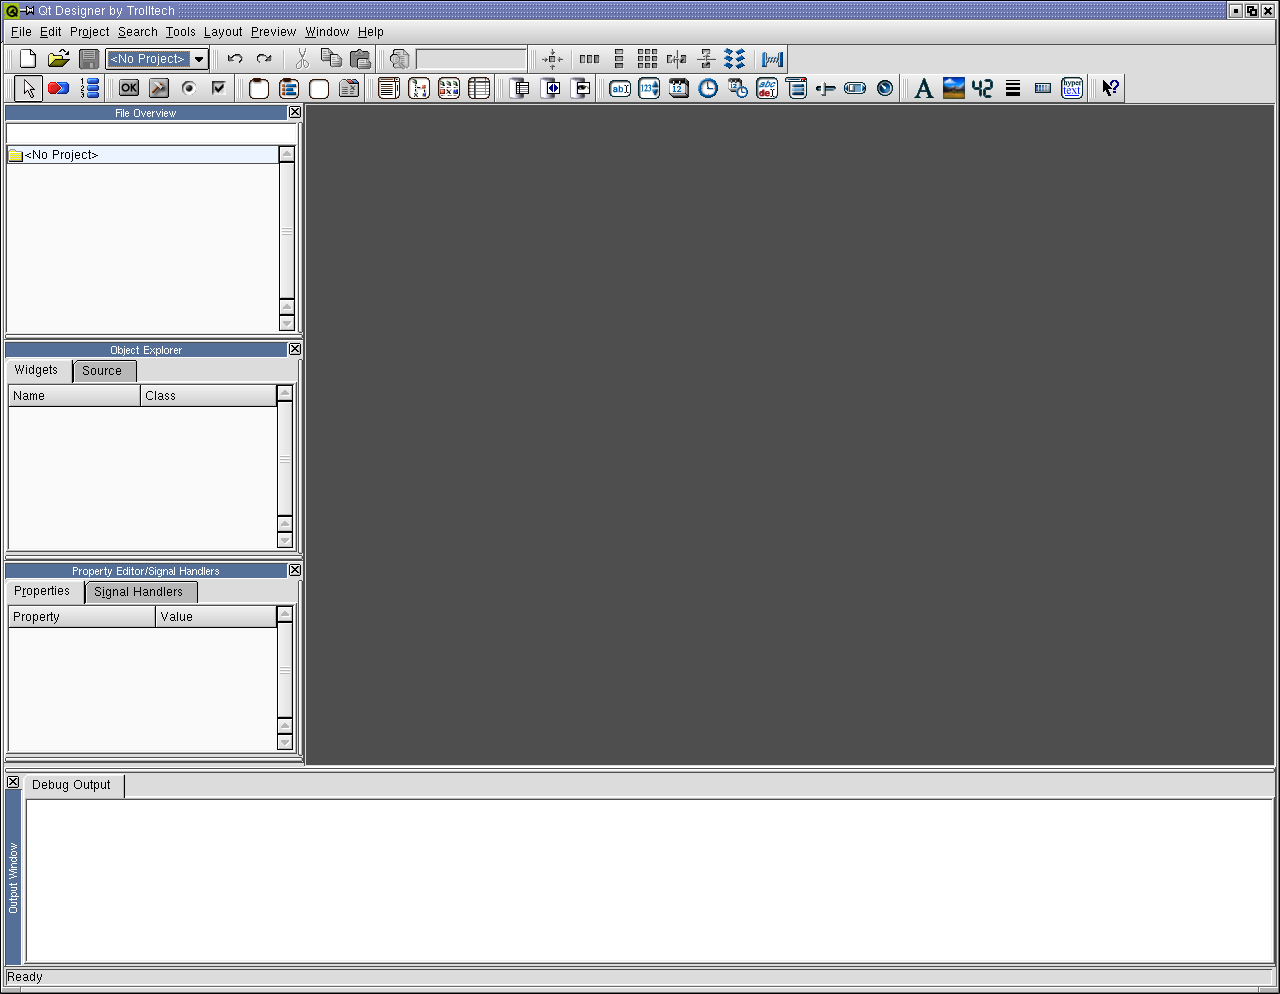
Figure 5-2 Qt Designer.
Let us begin by creating a new C++ project. Simply choose File - New. Mark "C++ project" and choose to continue. In the next dialog (figure 5-3), fill out a name for your project here (use the "..." button to get a file dialog). I choose to call it simple-dialog.pro. There is no need to touch any of the other tabs at this moment, but feel free to explore before clicking the Ok button.
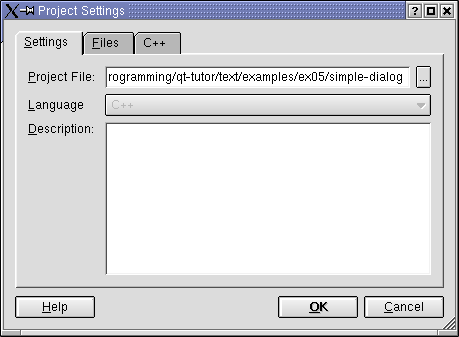
Figure 5-3 The project settings.
Now we have a project, so all that is left is to put things in it. Choose File - New again, but this time, add a dialog to the project. You will end up with an empty dialog named Form1. We will begin by renaming it to something better such as dlgMain. This is done by changing the name property in the property editor usually shown at the right side of the Qt Designer main window. If you cannot find it, make sure that it is visible by checking the Windows - Views sub menu. The property editor/signal handlers should be checked. (The dlg prefix indicates that we are dealing with a dialog. This is a bit Microsoftish, but I feel that it clarifies things when reusing the code.)
NOTE! You must name all your widgets, dialogs and windows before editing the corresponding code if you want to avoid confusing Qt Designer.
Table 5-1 summarizes the changes made to the properties of the dialog:
| Widget | Property | New Value |
| dlgMain | Name | dlgMain |
| dlgMain | Caption | Simple Dialog Example |
Table 5-1
Now we are ready to start adding widgets to the dialog. Add a group box containing a list box, a line edit and two buttons. Below the group box, add another button. The widgets are available from the toolbars and their names are shown if the mouse pointer is held above the button for a short while.
Figure 5-4 shows the preferred names and approximate placement of the widgets in the dialog.
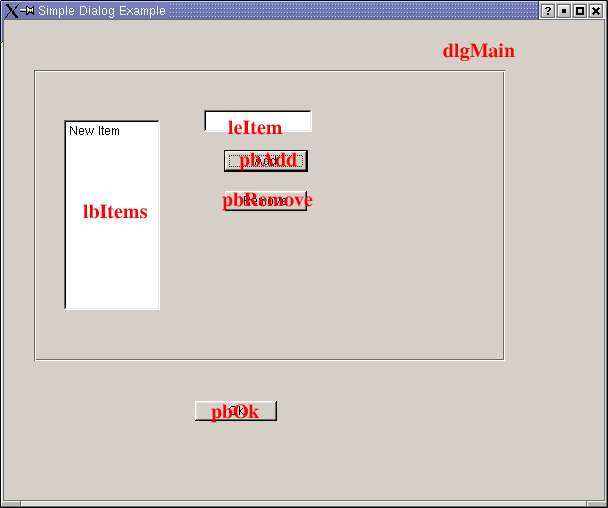
Figure 5-4 Widget names.
The button below the group box is named pbOk. The other two buttons are named pbAdd and pbRemove. The list box is named lbItems, the line edit leItem. Table 5-2 summarizes the changes made to their properties.
| Widget | Property | New Value |
| pbAdd | Name | pbAdd |
| pbAdd | Text | Add |
| pbAdd | Default | True |
| pbRemove | Name | pbRemove |
| pbRemove | Text | Remove |
| pbOk | Name | pbOk |
| pbOk | Text | Ok |
| lbItems | Name | lbItems |
| leItem | Name | leItem |
| GroupBox1 | Title | (empty) |
Table 5-2
To test the dialog, choose a style that you like from the Preview menu (try several styles and compare them). Figure 5-5 shows my result in Windows style, but what you have may look completely different. The important is that you have the same widgets in the dialog.
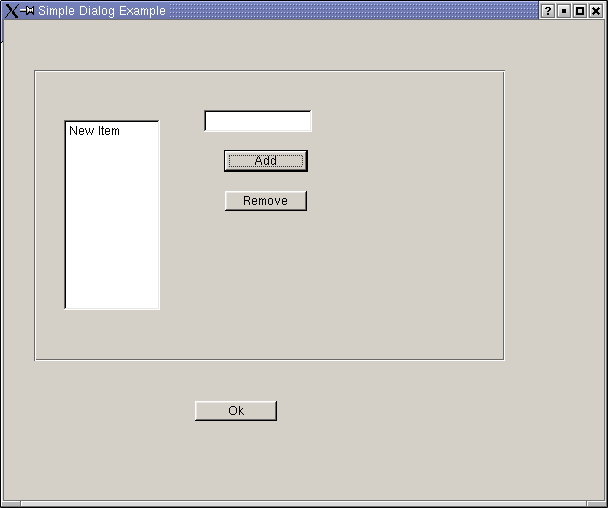
Figure 5-5 The first preview.
I think that we all can agree that this is plain ugly. Before you start rearranging the widgets to improve their appearance we must discuss a Qt specific topic. Qt is designed to run on many systems ranging from palmtops to highend Unix servers. It also support internationalized applications with support for any conceivable language. To make it possible to run Qt applications with different texts in the same place and in any screen resolution there is a solution called layouts. Instead of specifying exactly where the widgets lie, we specify how they lie in relation to each other. You will soon see what this means.
Before applying any layouts we must add spacers to fill the empty space of our dialog. The spacer is used as a widget but will be invisible at run time. They are picked from the toolbars and drawn in the dialog just like other widgets. In figure 5-6 the two spacers used in this dialog are shown.

Figure 5-6 Where to put the spacers.
To select multiple widgets at once, pick the first, then hold shift while selecting the others. Now select the spacer to the left of the Ok button and the button. Then click the "layout horizontally" button. Figure 5-7 shows the different layout buttons as shown in the Qt Designer toolbar (notice that they go blue when active).

Figure 5-7 The layout tools.
Now select the line edit and the two buttons in the group box together with the spacer and choose to lay them out vertically.
Then mark the entire group box and choose to layout them horisontally (this applies to all widgets inside the group box).
Finally, choose the dialog followed by layout vertically. If you make any mistakes when applying layouts, or you feel like experimenting, simply select a layout and click break layout to start over.
Previewing it should give you something like the dialog shown in figure 5-8. Change the size of the dialog to test the flexibility of layouts. Just imagine if all the list boxes that are too narrow in win32 applications could do this!
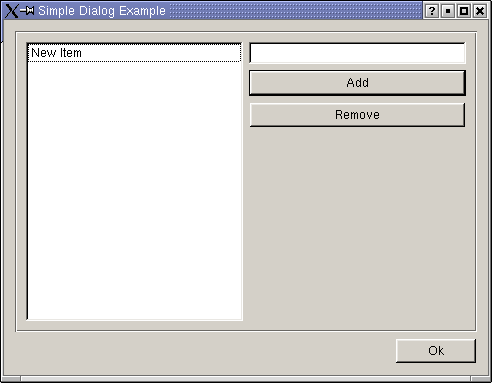
Figure 5-8 The dialog with layouts applied.
Now we have completed the visual design of the dialog. There are just two more visual things left to do before we start writing code.
The first thing is to fix the tab order, i.e. the order that the widgets are activated when the tab key is used to navigate through the dialog. Simply click the tab order button (looks like three blue lines with 1, 2 and 3 written to the left), then click the widgets in the order that you want. To exit the tab order mode, click the arrow in the toolbar (the tooltip for the arrow is Pointer).
Now, look to the object explorer, usually above the property editor. Select the members' tab (called source tab in older Qt releases) and add two public slots (right click on the public item below the slots item). Figure 5-9 shows the slots that are to be added. Remember the parentheses when declaring each slot.
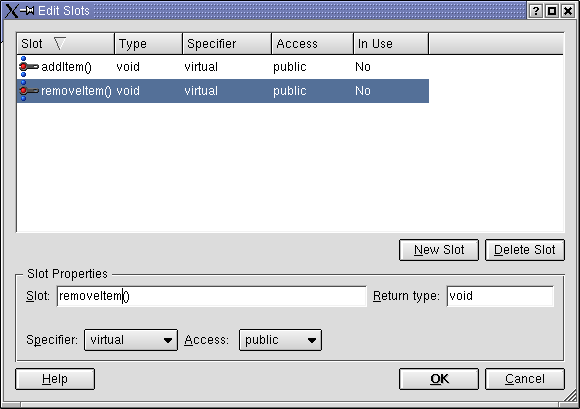
Figure 5-9 The dialog slots.
Now, the time has come to add some code. Close the dialog by clicking the Ok button, then begin by clicking on one of the slots that you just created. This will show a code window with the code shown in example 5-1.
/****************************************************************************
** ui.h extension file, included from the uic-generated form implementation.
**
** If you wish to add, delete or rename slots use Qt Designer which will
** update this file, preserving your code. Create an init() slot in place of
** a constructor, and a destroy() slot in place of a destructor.
*****************************************************************************/
void dlgMain::addItem()
{
}
void dlgMain::removeItem()
{
}
Example 5-1
Before we start altering the code, we will add one last slot. This time, add a protected slot named init(). This slot will automatically be added in the source window. This is one of two special slots added by Qt Designer to avoid the old (Qt version 2.x) approach when it was necessary to sub-class each dialog to add a constructor or destructor. The protected slots init() and destroy() save you from this approach. The design is more pragmatic than the old, and removes one of the inconviniences of a too clean interface.
In the addItem() slot, we perform the actions that are to be taken when the user clicks the add button. The actions are to check if the line edit widget contains any text and if so, add it to the list, then empty the line edit widget and set the current focus there so that the user can continue typing.
The removeItem() slot simply checks if any item is selected in the list box widget and if so, removes it.
Finally, the init() slot ensures that the list box is empty and then sets the focus to the line edit widget.
When writing code, you will notice that the type ahead function of Qt Designer only lists properties and slots. Thus the methods that we use are not listed.
The final code is shown in example 5-2.
/****************************************************************************
** ui.h extension file, included from the uic-generated form implementation.
**
** If you wish to add, delete or rename slots use Qt Designer which will
** update this file, preserving your code. Create an init() slot in place of
** a constructor, and a destroy() slot in place of a destructor.
*****************************************************************************/
void dlgMain::addItem()
{
if( leItem->text().length() > 0 )
{
lbItems->insertItem( leItem->text() );
leItem->clear();
}
leItem->setFocus();
}
void dlgMain::removeItem()
{
if( lbItems->currentItem() > -1 )
lbItems->removeItem( lbItems->currentItem() );
}
void dlgMain::init()
{
lbItems->clear();
leItem->setFocus();
}
Example 5-2
Before we can compile this example, we need to add a main() function to our project. It is best to separate the code into modules, and thus keep the dlgMain code in it's own files. Thus we add a new C++ source file (use File - New as before, but add a C++ source file this time).
Add the code from example 5-3 to the newly created file and save it as main.cpp. Read the comments to understand how it works.
// Header for the QApplication class
#include <qapplication.h>
// Header for our dialog
#include "dlgmain.h"
// Remember the ( int, char** ) part as the QApplication needs them
int main( int argc, char **argv )
{
// We must always have an application
QApplication a( argc, argv );
dlgMain *m = new dlgMain(); // We create our dialog
a.setMainWidget( m ); // It is our main widget
m->show(); // Show it...
return a.exec(); // And run!
}
Example 5-3
Now we are ready to compile the project, but first we need to create a Makefile. Make sure to save everything in Qt Designer (use File - Save All) then switch over to a console and cd to the project folder. Now run qmake on the project .pro file that Qt Designer has created. For example run qmake simple-dialog.pro, then run make. If all the code is correct, the result will be an executable with the same name as the project, i.e. simple-dialog, in my case.
If you run the executable produced by make, you will notice that it looks good, but nothing works. This is because we have not yet connected any signals to our slots. To do this, switch back to Qt Designer, or re-open it if you closed it.
Select the connect signals/slots tool (between the pointer and tab order tool in the tool bar). As our dialog (dlgMain) and its widgets contain the signals and slots that we intend to use, we can connect the signals from the different widgets to the appropriate slots visually. Simply click and drag the mouse from one button widget at a time to a spot on the actual the dialog (it will highlight) and release the mouse button. In the dialog that appears, connect each button's "clicked"-signal with the appropriate slot. The pbAdd signal should be connected to addItem, pbRemove to removeItem and pbOk to close. To avoid having the connection tool deselected after each connection, you can double click it on the tool bar the first time you select it.
To verify that the signals and slots are properly connected, right click on the dialog and select connections from the popup menu that appears. The resulting dialog should look like figure 5-10.
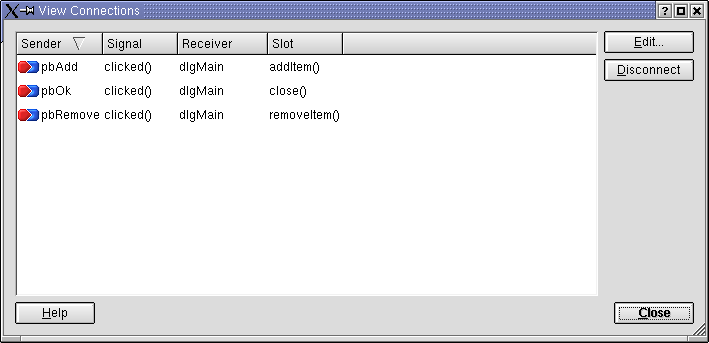
Figure 5-10 The signal and slot connections.
Now, return to the console, run make and try running the resulting executable. If everything is right, it should work as intended!
When pressing return or enter in the line edit, a push button will be activated. This issue was discussed in the qt-interest mailing list here. Search this list if you have any problems, and subscribe to it. It is really interesting.
Before completing this chapter, I want to point out the architecture of this application. We do not have a message loop, nor any place from where things are controlled. Instead we instantiate a dialog, connect events to slots and put the functionality in the slots. This is event driven programming!
The example code from this chapter can be downloaded from here.
This chapter covers the basic Designer approach. This is the way that we will do most things thoughout this tutorial.
This is a part of digitalfanatics.org and is valid XHTML.
Copyright (c) 2002-2004 by Johan Thelin (e8johan -at- digitalfanatics.org). This material may be distributed only subject to the terms and conditions set forth in the Open Publication License, v1.0 (local copy) or later (the latest version is presently available at http://www.opencontent.org/openpub/). Distribution of substantively modified versions of this document is prohibited without the explicit permission of the copyright holder. Distribution of the work or derivative of the work in any standard (paper) book form is prohibited unless prior permission is obtained from the copyright holder.