 As things become more and more mobile, portable, or even wearable, power consumption becomes important. FreeRTOS moves in this direction by supporting a tickless idle process. But first, what is really the problem?
When a system has nothing to do, it goes to the idle task. This can be a simple loop, doing nothing. Doing nothing, however, consumes power. One way to attack this is to reduce the performance of the processor while in the idle task. However, in most modern OSs, including FreeRTOS, there is a timer task running. This means that the processor leaves the idle task quite frequently, using power.
To get away from this, FreeRTOS supports a tickless idle task. By setting the configUSE_TICKLESS_IDLE, the idle task suppresses ticks and the processor stays in a low power mode for as long as possible.
The actual implementation relies on a function called portSUPPRESS_TICKS_AND_SLEEP. This method is highly CPU specific and is currently supported on ARM Cortex-M3 and ARM Cortex-M4 ports. If you happen to use FreeRTOS on a different piece of silicon, you can implement the function yourself.
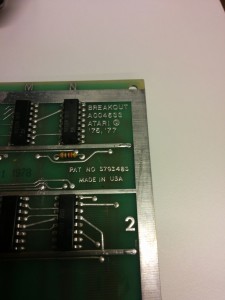
 A friend of mine, kralleman, is crazy about retro games and their hardware. I mean properly crazy. Crazy enough to appear on national TV, as well as having three episodes of a local retro gaming show dedicated to his own collection (